Punchy spiked cider

CiderPunch

I love the chaos of the holidays. Even though I only have one sibling, I also have a bunch of cousins. Being of Filipino descent, that meant everyone got together for feasts. And I mean feasts! Along with the requisite turkey, stuffing and what-not (man, I love what-nots), there would also be Filipino dishes to enjoy.

This year we’re spending Thanksgiving stateside, and I’ll be hosting the hubs’ family. Compared to a houseful of more than twenty people, my holiday will be a little more intimate. I am no less excited about it though. My fam loves their wine and drinks, especially the cousins. It is not a feast unless it begins with some mixed drinks and apps, and ends with dessert and Kahlua and coffee.

Since I’m planning the turkey day menu this year, it is only fitting to add a spiked cider to the menu, in honor of the folks back home. Warm cider drinks are a popular choice this time of year, but with all the dishes that need to stay warm for the meal, I decided to go with a chilled drink. Nevertheless, the spiced rum will warm you up. Garnished with a apple slice, it’s the perfect aperitif to dinner.

CiderPunch1

Punchy Spiked Cider

1/2 gallon of fresh apple cider

1 1/2 cup spiced rum (such as Captain Morgans)

2 cinnamon sticks

2 tsp fresh grated nutmeg

1 tsp ground ginger

1 gala apple, thinly sliced, for garnish

1.  Combine first five ingredients in a large pitcher. Stir well.

2. Cover pitcher and place in fridge for at least 2 hours, or up to overnight. Strain into glasses and garnish with apple slice to serve.

Easy Tangy Citrus Chicken

Lemon Chicken

I love lemon. I love how it makes you pucker. I love how it makes everything smell fresh. I love that lemon can be used to counter a dish that tastes too sweet, or too rich, or just flat.

But the hubs hates lemon. He has this weird lemon radar, that goes off at even the slightest detection of tang.

“Baby, whats in this?”

“Nothing weird, just try it.”

“There’s lemon in here, isn’t there…”

Dangit.

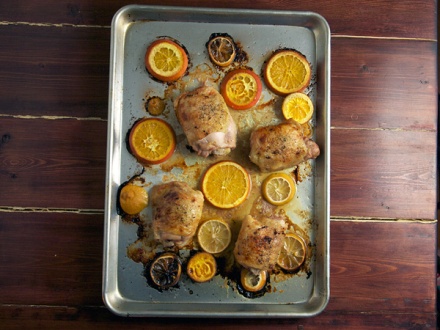
I was craving Greek chicken, marinated in lemon juice and olive oil, baked in the oven alongside wedges of potatoes. But alas, I didn’t want to cook a different dish for my lemon-phobic love. So I came up with this simple citrus chicken. The oven was hot enough to crisp the skin, while leaving the meat nice and juicy. It was tasty served over rice, with the pan juices from the chicken and orange slices spooned over-top. Just add a simple green salad to round out the meal, perhaps with a honey-lemon vinaigrette? *sigh* Or not.

LemonChicken1

Easy Tangy Citrus Chicken

Marinade

1 cup of orange juice

2 tbls olive oil

2 tbls honey

1 tsp dried rosemary

2 tsp dried thyme

2 tsp dried oregano

2 cloves of garlic, minced

2 tsp salt

1 tsp pepper

For chicken

Cooking spray

4 chicken thighs or 2 chicken breast, skin-on & bone-in

1 medium orange, sliced

1. Combine marinade ingredients into a gallon zip-top bag. Wisk to combine.

2. Add chicken to marinade and place bag into a bowl to catch drips. Marinate in fridge for at least an hour or up to overnight.

3. Preheat oven to 425 degrees. Apply cooking spray to a lipped sheet pan. Arrange chicken and orange slices on sheet pan. Discard marinade.

4. Cook chicken until skin is crispy and meat is cooked to 165 degrees, about 30 minutes.

Lemon Chicken

Filipino chicken soup (tinola manok)

Chicken tinola

I meant to post this recipe last week, but life got in the way. I’m not complaining though. It was all the good things in life. Birthdays, fall photos, spending time with the hubs and little one. I had this intention of setting up a schedule for the blog, of updating it on specific days so that I would not get lazy and let things slide. But last week the leaves were changing and the weather was perfect; there was not a day where I wanted to sit down and write. I wanted to get out and live. And so I did.

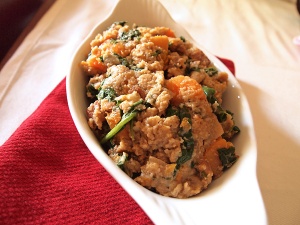
My mom is a great cook, as is my dad. This is one of my favorite recipes of theirs, warm and comforting, it reminds me of home. Normally it is made with green papaya and hot pepper leaves, but chayote and baby spinach are appropriate substitutes. The carrot is an unusual addition, but I thought it gave the dish a little needed color.

I may be 14 hours and a border away, but this dish takes me home.

Chicken tinola

Filipino Chicken Soup (tinola manok)

2 pounds chicken pieces (I used thighs)
1 thumb size ginger root, minced
3 garlic cloves, minced
1 medium onion, sliced
2 medium chayote or green papaya, cut into wedges
12 ounce bag of organic baby spinach
1 Tbsp Fish Sauce (Patis)
3 cups of low sodium chicken stock
2 tbsp canola oil
Salt and pepper

1. Heat oil in a large pot over medium high heat. Add onion and sauté until translucent. Add chicken, ginger and garlic and cook until chicken is slightly browned.

2. Add stock and Patis and bring to a boil. Lower heat to barely a simmer and poach until chicken is cooked through, about 45 minutes. Skip any scum and fat if necessary.

3. Add chayote and carrot and simmer for another 10 minutes, or until vegetables are tender.

4. Turn off stove and add spinach, stirring until it is wilted. Add salt and pepper to taste and serve with steamed jasmine rice.

Foolproof Tender Popovers

Foolproof popovers

It’s November and that means the beginning of my favorite time of the year. Thanksmas. Or should that be Thanksgivemas? It does not seem fair that the two best holidays in the calendar happen within about a month of each other. In Canada, we are given a reprieve between Thanksgiving and Christmas. By enjoying turkey day in early October, it seems like you’re better able to enjoy fall. You get to partake in all of the best of the harvest, see the leaves fall, and then top it all off with Halloween. Then you get two whole months to prepare for Christmas.

The holidays feel so much more compressed in the States. You barely get to tuck into the turkey, before you have to think about the crazy day that is Black Friday, and the kick off for Christmas. I love, love, love the holidays, so most days the short season seems that more festive. But I can see how it can be stressful for many.

To minimize stress, I like to plan. I plan just about everything, and often include a timeline. “The timeline!”, is often an exclamation the hubs like to say when we’re on vacation. It all started with our honeymoon in Maui, but I digress.

So here in early November, I am planning the Thanksgiving dinner menu. Last year we hosted about 14 people around our 9 foot dining table, to much success. There was some last minute defrosting issues, a 6 month old infant, and just enough chaos to make it all memorable.

Last year I don’t even remember if we had bread. I do remember the juicy turkey and the creamy homemade New York cheesecake. But I do not remember if we had rolls, or breadsticks, or what. This year is going to be different. This year I came across the perfect popovers by Food Network’s Melissa d’Arabian. The name isn’t hyperbole. It is in fact the easiest, most tender, and consistent popover recipe I’ve come across. Even with the little one under feet, it has come out just about perfect every time.

So this will definitely grace this years Thanksgiving table, ready to sop up all the gravy. And don’t be surprised if it’s on the Christmas Eve roast dinner as well. Foolproof popovers, the perfect Thanksgivemas accompaniment.

Popovers

Foolproof Popovers (from Melissa d’Arabian)

3 tablespoons melted butter, divided
2 eggs
1 cup milk, warmed for 30 seconds in the microwave (should be lukewarm to warm)
1 cup (8 ounces) all-purpose flour
1 teaspoon kosher salt

1. Preheat the oven to 400 degrees F.

2. Using a pastry brush, coat 8 muffin cups with 1 tablespoon of the melted butter and put the tin in the oven for 5 minutes.

3. Meanwhile, mix the eggs in a blender until light yellow. Add the warmed milk and blend.

4. Add the flour, salt and remaining melted butter, and blend until smooth.

5. Pour the batter into the warmed muffin tin and return it to the oven to bake until golden, about 35 minutes. Remove from the oven and serve warm.

Read more at: http://www.foodnetwork.com/recipes/melissa-darabian/fool-proof-popovers-recipe/index.html?oc=linkback

Savory Guinness Stew Hand Pies with Flaky Cheddar Crust

Guinness Pie

There’s something magical that happens to stout when you cook with it. Its chocolate undertones become more pronounced, as if the heat has broken down the beer’s molecules into its essential components, love and chocolate. What is that you say? Stout is made from water, and perhaps roasted barley, hops and yeast? Maybe literally, but figuratively, when that long-simmered stout reaches my tongue, my taste buds scream chocolate. Oh, and I love you.

Thats why, when presented with several pounds of chuck roast and little time to put things together, that stout came to mind. The little one had been taking up most of my attention this week, with her little nose running, and her little feet scampering into who-knows-what. So, not having any time to even brown the meat, I cubed it and chucked it into a crock pot with onions, carrots, celery and mushrooms. And of course two (that’s right) bottles of Guinness. After a day at work, we came home to the heavenly smell of simmering beef.

While browning the meat may have made the stew that much better; I’m thinking the second bottle of beer almost made up for the lack of fond (you know, the brown bits left from browning meat). Also, all of that chocolately stout disguised any paleness of the beef as a result of my laziness.

The first night, we ate the stew with a simple crisp green salad and delicious popovers. The second night was on its own, although I had planned to serve it over a bowl of white rice. On the third night, the stew was wrapped up by a  flaky cheddar crust and eaten as a hand pie. Yes, this recipe makes a lot of stew. And yes, the third iteration was my favorite. Serve the stew naked or as a pie; brown the beef, or choose not to. Either way, make sure you use two bottles of stout, and make sure you listen as your taste buds proclaim their love.

Guinness Pie

Check out that flaky crust!

Guinness Pie

Savory Guinness Beef Stew

2-3 pounds chuck roast, cut into 1 inch cubes
5-6 large organic carrots, cut into large cubes
8 ounces white button or crimini mushrooms, sliced in half
4 stems organic celery, cut into large cubes
1 large onion, cubed
2 tbls. tomato paste
1 tbls. brown sugar
1 tsp dried thyme
1 tsp dried rosemary
1/4 cup fresh flat leaved parsley, chopped
1 tbls. salt
1 tsp fresh ground pepper
2 cups low sodium beef or chicken broth
2 bottles Guinness or similar stout
4 tbls. butter
4 tbls flour
1 egg, lightly beaten.

1. Set crockpot to low, add meat, followed by vegetables, tomato paste, she and herbs.
2. Mix in liquids and gently stir to combine all.
3. Cook on low for 8-10 hours. Adjust seasoning if required.
4. Melt butter in a medium saucepan over medium heat. Stir on flour and mix for five minutes.
5. Whisk in a couple of ladle culls of the stew broth into flour and butter. Once it has the flour mix has dissolved, add the rest of the broth and bring to a boil to thicken.
6. Add the thickened broth back to crockpot and serve in bowls.

Hand Pies
Prepared stew
Flaky cheddar crust
 
1. Cool stew and roll out dough.
2. Cut dough into 5 inch diameter circles.
3. Place 1-2 tbls filling in the center or the circles.
4. Fold over dough and seal with a fork. Brush tops with egg, and create vent holes.
5. Place pies on a baking sheet, lined with parchment paper.
6. Bake for 25-30 mins, or until golden brown.

Flaky Cheddar Pie Crust

Cheddar cheese pie crust

I first learned how to make pie crust was a teenager. I fell in love with quiche, but my mom didn’t know how to make it, so I taught myself. Back then, I used shortening and the two fork technique, and despite my lack of experience and kitchen tools, the crust came out okay. That is, until I discovered frozen pie crust. At the time, frozen crust was a revelation to me, and it cut my quiche prep time considerably.

Fast forward years later, and faced with a double batch of beef stew, I decide to make hand pies.  But frozen supermarket pie crust simply won’t do. Looking for a good crust recipe, I come across The Smitten Kitchen, whose use of vodka sounds intriguing. I love when a good recipe turns out because of science. The crust is flakier because of vodka’s low evaporation point? Sure, I’ll go with that.

But what made the crust fantastic, was the addition of good cheddar. The sharp tang of the cheddar along with the buttery crust just made it sublime.  It was a great foil for the stew, the bite of the cheese offsetting the richness perfectly. Have I been turned off frozen crust completely? Heck no. It has it’s place, as a time-saver and recipe helper, frozen crust is the way to go. But I am glad I took a chance with this recipe, and this is only the beginning. Apple pie with cheddar crust, chicken pot pie with parm crust, bacon quiche with pepper jack crust. Oh pie, I’ve only just begun.

Adapted from The Smitten Kitchen

Cheddar Cheese Crust

2 1/2 cups (12 1/2 ounces) unbleached all-purpose flour
1 tsp table salt
2 tbls sugar
1 cup of cold organic unsalted butter, cut into small dice
1 cup good sharp cheddar cheese
1/4 cup cold vodka
1/4 cup cold water

1. Once you’ve diced your butter, place it back into a small bowl and into the fridge.

2. Measure out flour (I like to weigh it) into a large bowl, and add salt, sugar and cheese. Mix to combine.

3. Add the very cold butter and cut it into the flour mix until it resembles coarse cornmeal.

4. Combine water and vodka into a measuring cup, and begin to fold in, a few drizzles at a time. Continue to drizzle in liquid and fold in dough until just combined.

5. Once the dough just comes together, use your hand to gather up the stray crumbs and knead a couple times to combine.

6. Divide dough into two balls, flatten into disks and place in fridge for at least an hour and up to 2 days. Roll out dough and use at will, brushing top with egg wash if desired. I found that baking at 375 degrees until golden brown resulted in a great crust.

Butternut Squash, Sausage, and Spinach Stuffing

Squash Stuffing

Ah butternut squash. Sweet and creamy, the perfect fall veg. Last week was Canadian Thanksgiving, so the hubs surprised me with fried chicken, mashed potatoes and brown gravy. Yes, fried chicken is indeed a proper substitute for roast turkey. So what was missing from this otherwise classic Thanksgiving dinner? Stuffing.

Stuffing is my favorite part of the holiday dinner, for sure. Especially when it’s cooked inside the bird, and the bread soaks up all the juices. Bread cubes saturated in poultry juice, heavenly! But when the dish is served outside the bird, it becomes the less flavorful cousin of stuffing, dressing.

Since one cannot stuff fried chicken (well I guess you could, but that’s for another post) what better way to liven up the boring dressing than with squash? Add some smoked sausage for a bit of meaty flavor, and throw in handfuls of baby spinach for some green and you’ve got the perfect Thanksgiving side. It was a weeknight, so to make things easy I went with a box of Stove Top. Of all the Thanksgiving food I like to make from scratch, stuffing is not one of them.  Perhaps I just haven’t tried a good homemade stuffing as of yet, but Stove Top just tastes better to me.  If you have a good stuffing recipe, let me know and I’ll try it. Until then, here is my doctored Stove Top stuffing, to go along with your fried chicken of course.

SquashStuffing2

Butternut Squash, Sausage and Spinach Dressing

1 box of Stove Top Stuffing (or your favorite boxed stuffing or homemade recipe, to feed 4)
2 cups diced butternut squash
1/2 lb diced smoked sausage
1 bag organic baby spinach
1 diced small onion
2 cloves garlic, minced
1 handful of flat leaf parsley, chopped
1 tsp ground sage
1/2 tsp ground nutmeg
1 egg, lightly beaten
Olive oil
Baking spray
2 quart baking dish

1. Prepare stuffing according to directions.

2. In a medium sauté pan, fry smoked sausage and onion in a tablespoon of olive oil until slightly browned. Add garlic and squash and allow squash to lightly caramalize.

3. Add spinach and cook until wilted.

4. In a large bowl mix prepared stuffing, squash mixture, parsley, sage, nutmeg and egg until combined.

5. Pour into a 2 quart baking dish sprayed with baking spray. Bake for 30 minutes or until top is golden.

Asian pork al pastor

Pork tacos

Asian pork al pastor, that’s a bit of a contradiction, isn’t it? There are cooks who cringe at the bastardization of traditional recipes. How dare I use soy sauce as a substitute for achiote, as there are absolutely no similarities between the two. This is know, but I needed something for color and flavor, and when I added some minced ginger, garlic and sesame oil and the Asian pork al pastor was born. Do not judge, until you try it.

Grilling is definitely the best method to cook the pork. After marinating in pineapple overnight, the meat is made so tender from the fruit’s enzymes that it is almost falling apart. So you certainly need some kind of grid to place on the grill grates if you decide that this is the way to go. The other option is to cook the meat in a pan in the stove top, but you won’t achieve the same smokey results. Also, if you fire up the grill, you may as well grill your tortillas as well. The combination of the sweet, tender pork, smokey tortillas and the spicy pineapple salsa is a classic one, with a bit of an Asian twit. Because that’s how I roll.

Ignore the weird shadows cast by the window blinds...

Ignore the weird shadows cast by the window blinds…

Loosely adapted from Steven Raichlen’s Tacos al Pastor

Marinade

1 cup sliced pineapple in juice

1/2 medium onion

juice of 1 lime

1/4 cup low sodium soy sauce

2 tsp minced ginger

1 tbls minced garlic

1 tbls sesame oil

1 whole jalapeno

Tacos

2 pounds pork shoulder, trimmed of fat, cut into 1/4 inch slices

corn or flour tortillas

pineapple salsa

Preparation

1. Add all marinade ingredients into a blender. Puree until smooth. Combine marinade and sliced pork into a large ziploc bag, mix, seal and place into a large bowl. Allow to marinate in fridge for at least 4 hours and up to one day.

2. Preheat grill to medium high heat.

3. Drain pork from marinade and grill on a grill grid or basket over medium high heat until center of meat is no longer pink.

4. Once pork is cooked, wrap in foil to keep warm.

5. Grill tortillas until warm and blistered in some spots. Serve pork on tortillas with pineapple salsa.

Pineapple Salsa

Pineapple Salsa

Today the calendar says October, but with the temps still in the low 80’s here, I can’t help but feel its still early September. And I hate it. It just doesn’t seem right that I’m wearing shorts and sandals in October. The Canadian in me yearns for the cooler, more comfortable weather, the boots and bonfires, the apple picking and pumpkin carving. Yes, I love all of the cliches of autumn, because they are comforting and remind me of family.

Despite all of this, I just can’t cook like its fall. It’s just too damn warm to fire up the oven and braise a roast. Thankfully, a cold front is rolling in next week. But today I made pineapple salsa to go along with the Asian pork tacos I’ll be grilling later on. I couldn’t find any organic pineapple at the store, but there were organic jalapeños, garlic and cilantro. I love how the spicy kick is tempered by the sweetness of the fruit. It might say October, but here’s a salsa recipe to go with the last of the Indian summer.

Pineapple Salsa

Pineapple Salsa
2 cups fresh pineapple, chunked
2 organic jalapeños, small dice (you can remove the seeds and ribs, but I left them in for the spice)
1/2 medium red onion, small dice
2 cloves organic garlic, minced
2 tsp minced ginger
Juice of 1 lime
1 large handful of organic cilantro, chopped
1 tbls sesame oil
Salt and pepper to taste

Preparation
1. Combine all ingredients. Let stand at room temperature for an hour, or in the fridge for at least 2 hours to let flavors develop.

2. Serve with grilled fish, chicken or pork or with chips.

Blueberry Streusel Coffee Cake

Blueberry  Streusel Coffee Cake

I had reservations about posting this particular recipe. Not that it came out all that badly, just that I’m not a fan of blueberries. Initially, the berries had been purchased because I saw this amazing smoothie recipe on Pinterest, that when combined with handfulls of spinach, dollops of yogurt and a spoonfull of chia seeds, promised to help me lose weight and get gorgeously glossy hair. Ultimately, it was all for naught. While I really didn’t mind the taste of the spinach, I just am not a fan of blueberries. Ah well, next time maybe I’ll try it with raspberries.

Anyways, back to the coffee cake. If it weren’t for the blueberries that ruined it for me, the cake turned out pretty well. The combination of the chunky streusel and the moist, tangy cake would have been a winner, if it weren’t tainted by the blueberries. Are you sold yet? If you like blueberries, you’ll like this recipe. Myself? Let’s just say my colleagues and the hubs benefited by my poor berry choices.

Blueberry Streusel Coffee Cake

Adapted from The Smitten Kitchen and PBS Food

Streusel Topping
1/3 cup dark brown sugar
1/3 cup granulated sugar
1 tsp ground cinnamon
1/8 tsp salt
1/2 cup (1 stick) butter, melted
1 3/4 cups cake flour

Coffee Cake
1/2 cup butter softened
1 cup sugar
1 egg
1 teaspoon vanilla extract
2 cups all-purpose flour
1 tsp baking soda
1 tsp baking powder
1/4 tsp salt
1 cup buttermilk
2 heaping cups organic blueberries
1 tbls flour

Preparation
1. Preheat oven to 350 degrees. Butter a 9 inch square baking pan.

2. For the streusel, add sugar, spices and butter in a small bowl. Then add the flour with a spoon, mixing it together until it resembles kneaded dough. Put aside until later.

3. For the cake, mix butter and sugar on medium speed of a stand mixer. Add vanilla and egg and mix until combined.

4. In a separate medium bowl, mix flour, baking soda, baking powder and salt.

5. On low speed, stir in buttermilk and dry ingredients until just combined.

6. Mix the tablespoon of flour with the blueberries. Carefully fold in the blueberries into the batter. Spread batter into prepared pan. Using fingers, sprinkle streusel on top of batter by breaking into large crumbs.

7. Bake cake in center rack of oven, until a toothpick comes out clean, about 50 minutes.

8. Cool completely and serve.